Monday, September 7, 2009

Jump Stitches


Digitizing to Reduce Jump Stitches

Written by Hilary and Graham Killerby from African Sewfari

Don’t you just hate loads of jump stitches in a design? I know that there are times they just cannot be avoided, but there are ways around these annoying jump stitches.

When using an Automatic program you are at the mercy of the program as far as the elimination of jump stitches is concerned. It all depends on the program you are using as to how successful the result is. However, it is possible to edit out certain jump stitches using an edit program to perfect your design. It is preferable to "manual punch" your design if you wish to minimize the number of jump stitches.

There are two methods we use to achieve the best results.

  • Hiding your traveling stitch lines.

  • Using the removal of overlay stitching which is referred to as "hole sewing" in certain programs.

Hiding Your Traveling Stitch Lines

In the first method, you do exactly what the name suggests - hide your traveling stitch lines between digitized objects of the same color in your design. All traveling stitch lines should be single using the default stitch length (or spacing).

Prior to commencing the digitizing of a design the planning stage is very important. It is invaluable to make a print of the design you want to use in order to plan the route and record the following information:-

  • Initially grade the design objects and number them in order from background objects (i.e. those at the rear of the design in 3D terms), through the intermediate objects to the foreground objects. The objects furthest away must always be digitized first.

  • The colors to be used must be decided on next and if two objects are considered to be equal in 3D value then the lightest colored object must be inserted first.

  • It is always desirable to try and hide lighter colored stitch lines under darker colored objects. Dark thread tends to show through lighter thread colors. It is therefore better to hide the lighter travel stitch lines and leave the darker colored connecting stitches as jump stitches if they cannot all be hidden.

  • Always record the sewing order of the traveling stitch lines on your design print out. Use A,B,C etc. so as not to confuse them with the object numbers. This is necessary as should you wish to change the color or sewing order of an object at a later stage, it will be necessary to edit the relevant traveling stitches as well.

  • When digitizing flowers, digitize the stems last. These can be a tad thicker to cover all the different colored rows of traveling stitches.

  • If you cannot avoid jump stitches, try and make them as LONG as possible so cutting is easy. The face is normally sewn out last and these jump stitches tend to be very tiny and difficult to cut. Try planning the order of digitizing them (eg. right eyebrow, left eye, mouth, left eyebrow, right eye).

HINT: Use a small piece of Solvy to cover the face before stitching. It makes snipping jump stitches far easier.

Removal of Overlay
The removal of overlay method works exceptionally well where one or more object/s are surrounded by another. Some programmers require one entire object to be completely surrounded by another in order to utilize this option while others will work with overlapping objects no matter how little the objects overlap each other.

Planning is once again the essence of success and a print out of the design is essential.

  • In this method the smaller objects are digitized first with the color order once again being done from lightest to darkest with the color of the largest object (cover object) being as dark as possible. This allows the traveling stitches to be hidden successfully.

  • Objects of the same color are linked with traveling stitch lines. The first lines can be placed in the most direct route between objects even if they traverse another color object to be digitized later as they will be hidden.

  • Be careful not to place the darker colored traveling lines too close to already digitized objects as they can end up showing through where the objects and the "cover object" meet.

  • When using this method it is important to increase the "Pull Compensation" factor to +50% of the normal default setting for both the objects and cover object.

Depending of the programmed and the ease of changing the sewing order, use one of the following:-

  • Once all the objects and the cover object have been digitized the cover object must be changed to sew first in order to allow the objects to be accessible for selection when effecting the removal of the overlay.

  • The alternative method is to save the objects and travel stitch lines after they are digitized. Delete them and digitize the cover object, inserting the saved objects on top of the cover object before the removal of overlay is implemented.

Whichever method is used do not forget to change the cover object to sew last in order to hide the travel stitches before saving the finished design.

Nashville Lace Denim


Re-Embroidered Lace

by Hope Yoder

If you have always wanted to embroider on denim but have never got around to it - the new Nashville Lace Embroidery Collection is the perfect type of design to embroider on denim because they are applique designs that are not too dense.

Get dramatic results when you use rayon thread to match your lace and metallic silver or gold thread to give a subtle accent to the lace.

These designs were created using English Cotton Netting as the base fabric (as shown on the stitch-outs). See what you can do for the Tween in your life (or for yourself).


To achieve this hip look, substitute inexpensive lace that you can find in 45" wide in any fabric store. It is an all-over lace that comes in many different colors. Ivory lace & gold metallic threads have been used on the Capri jeans.

Pink scalloped lace with silver metallic thread was used on the Jean Jacket. This was a 3" wide trim lace purchased at a sewing market years ago. Experiment with your scraps of lace or fabric to get different looks.


Get a FREE gift with purchase when you buy this new collection. All of the step by step color details of "Re-embroidered Nashville Lace Denim" is your free gift when you purchase the Nashville Lace Embroidery Collection.

Shy about using Metallic threads? Here are a few tips that might help you:

  • Use a thread net and omit the spool cap (less stuff to get tangled on)
  • Use a 90 Metallic needle or a 90-100 Topstitch needle
  • Slow the speed of the machine to less than half speed
  • Hope's personal preference is RA Metallic J thread which likes to be put horizontal on the spool cap


Re-Purposed Lace Camisole

by Hope Yoder

Re-purpose lace for an “Unforgettable” silk camisole that will turn heads. The ingredients for this blouse include the Nashville Lace embroidery designs that are re-embroidered over lace fabric.

Embroidering over a lace foundation fabric, give a romantically elegant look to any project.

Click here to view more details on the Secrets Blog.

Fancy Band Sleeve Embellishments


Fancy Band Sleeve Embellishments
by Hop
e Yoder

Hope has a new magazine article called "Lacey Shrug" that is featured in Issue #117 of Sew Beautiful magazine. This is a two part series that features a lovely shrug pattern that can be worn as lounge wear or as an heirloom blouse. Hope is confident that you will enjoy this new article and may get inspired to use the embroidery designs from Hope's Romantic Hearts & Bows & English Lace Ovals embroidery collections.

The sleeves are embellished with an insertion embroidery design that was created to weave ¼" silk ribbon through. The design is "Insertion2" from the English Lace Ovals collection. Both sleeves will be embroidered in one hooping to save time. Lace has been added to frame the design, giving it a simple elegant look.

  • Cut a piece of batiste and heavily starch. Two insertion designs were combined in a software program to fit inside a 225mm x 140mm hoop.
  • Hoop with light weight tear away and embroider the two insertion designs.
  • Remove stabilizer and cut open the buttonholes. Two bands will be cut in the following measurements: Center design and cut each strip 2" x 15".
  • Attach a piece of insertion to each side of the strips using "Lace to Fabric" technique.
  • Attach a piece of edging lace to lower edge (sleeve hemline) using "Lace to Lace" technique.
  • Make any length adjustments on the pattern for sleeve length, and add a block of fabric to the sleeve band to give you enough fabric to cut out a right and left sleeve. To attach the block of fabric, use the "Lace to Fabric" technique.
  • Cut out a "Right & Left" sleeve separately remembering to flip the pattern.

Make 3D Flowers


How to make your own 3D Flowers.
By Evy Hawkins at A Bit of Stitch

These flower brooches are made from silk organza or cotton organdy. The different sized petals are made in the hoop then stacked together to form a flower. The centers can be anything you choose a beautiful button, unusual beads, bits of fuzzy trim or even a small sparkly pin!

Materials You Will Need:

  • ½ yard of flower petal color silk organza or cotton organdy
  • ½ yard of leaf color silk organza or cotton organdy
  • Thread to match
  • Sew-on bar Pin Back
  • Ornate jeweled buttons ¾” to 2" in size
  • Helpful Tips:

All the designs fit in a 4x4 hoop. To maximize the number of flower petals you can get from your fabric, do not cut out the flower petals until you have finished making all you wish. Just re-hoop the fabric placing the designs as close together as you can without overlapping. A half-yard of fabric makes a LOT of flower petals!

Polyester organza is not recommended for this project as they fray easily. Silk organza has a nice crisp feel and holds the finishing satin stitch edge very well

Suggested Tools:
Small curved bladed, very sharp scissors. (The best scissors for this project are from the Scissor Man) Find out how to order here.

Directions for Making the Brooches:

Hoop two layers of leaf color fabric or flower color fabric. Stitch the leaf and flower petal designs. You will not need to use stabilizer. Fine cotton thread makes a nice finished edge on cotton fabrics. Rayon or polyester embroidery thread works well on silks. Use the same color and type of thread in your bobbin as your top thread.

When you have finished making as many leaf and flower petal parts as you wish carefully cut them out. The little curved snips listed above make this job fast and easy. Cut as close as possible to the edge without cutting through the edging. If you make a mistake and clip the threads, a small drop of Fray Check will fix it.

Stack the flower petals in a pleasing arrangement, largest on the bottom, smallest on the top. Tack together with a few small hand stitches on both sides of the center of the flower, but not directly in the middle. Cut or poke a small slit into the very center of the flower petals, going through all of them. Slip your button shank into that hole, pulling it through underneath. Hand stitch the button in place on the back of the flower petals.

Place a leaf (or two as desired) over your hand stitching and stitch down following the circle in the center of the leaf design. Place a brooch pin over the stitching, and sew into place securely. Remember to check the placement of the brooch pin before stitching into place so that your flower brooch hangs correctly when pinned on.

You may use as many flower petals and/or leaves as desired. The mum and the flower make a very nice flower brooch using six petals, two of each size. Beading in the place of a button makes a lovely center, as do other trimmings such as fringe or looped ribbon. Feathers can be added between the flower layers for more interest.

Flower brooches are not just for your lapel -- Back a pair of pretty flowers with shoe clips and wear them on your shoes! Or construct a garden on a pretty straw handbag. Sew some on a linen guest towel using the center design included in the design set. (Complete directions for this method of application are included in the set.) No matter where you put they are sure to bloom!

Resources:
www.orientalsilk.com see Mulberry Silk for silk organza
www.thaisilks.com
www.denverfabrics.com
G-Street Fabrics see www.gstreetfabrics.com for locations

These directions may not be reproduced, copied or distributed without prior permission from Evy Hawkins at A Bit of Stitch. Thank you. For a printable version of these instructions please click here.

FREE Flower Brooch Design and Instructions
Evy has generously donated a FREE Flower Brooch Design, complete with leaves. Download this and see how easy it is to make your own 3D Flower Brooch. Full directions are included with your download. You will find the freebie on the Spring Blooms page.

FREE Applied Butterfly & Flower
Applied designs are especially digitized to be 3D. You can download freebies to try from the Applied Bugs & Applied Flowers pages at A Bit of Stitch.

The insect wings or flower petals are stitched separately on sheer fabrics and applied to your projects with the body design of each bug, or stem of each flower.

Make 3D Flowers


How to make your own 3D Flowers.
By Evy Hawkins at A Bit of Stitch

These flower brooches are made from silk organza or cotton organdy. The different sized petals are made in the hoop then stacked together to form a flower. The centers can be anything you choose a beautiful button, unusual beads, bits of fuzzy trim or even a small sparkly pin!

Materials You Will Need:

  • ½ yard of flower petal color silk organza or cotton organdy
  • ½ yard of leaf color silk organza or cotton organdy
  • Thread to match
  • Sew-on bar Pin Back
  • Ornate jeweled buttons ¾” to 2" in size
  • Helpful Tips:

All the designs fit in a 4x4 hoop. To maximize the number of flower petals you can get from your fabric, do not cut out the flower petals until you have finished making all you wish. Just re-hoop the fabric placing the designs as close together as you can without overlapping. A half-yard of fabric makes a LOT of flower petals!

Polyester organza is not recommended for this project as they fray easily. Silk organza has a nice crisp feel and holds the finishing satin stitch edge very well

Suggested Tools:
Small curved bladed, very sharp scissors. (The best scissors for this project are from the Scissor Man) Find out how to order here.

Directions for Making the Brooches:

Hoop two layers of leaf color fabric or flower color fabric. Stitch the leaf and flower petal designs. You will not need to use stabilizer. Fine cotton thread makes a nice finished edge on cotton fabrics. Rayon or polyester embroidery thread works well on silks. Use the same color and type of thread in your bobbin as your top thread.

When you have finished making as many leaf and flower petal parts as you wish carefully cut them out. The little curved snips listed above make this job fast and easy. Cut as close as possible to the edge without cutting through the edging. If you make a mistake and clip the threads, a small drop of Fray Check will fix it.

Stack the flower petals in a pleasing arrangement, largest on the bottom, smallest on the top. Tack together with a few small hand stitches on both sides of the center of the flower, but not directly in the middle. Cut or poke a small slit into the very center of the flower petals, going through all of them. Slip your button shank into that hole, pulling it through underneath. Hand stitch the button in place on the back of the flower petals.

Place a leaf (or two as desired) over your hand stitching and stitch down following the circle in the center of the leaf design. Place a brooch pin over the stitching, and sew into place securely. Remember to check the placement of the brooch pin before stitching into place so that your flower brooch hangs correctly when pinned on.

You may use as many flower petals and/or leaves as desired. The mum and the flower make a very nice flower brooch using six petals, two of each size. Beading in the place of a button makes a lovely center, as do other trimmings such as fringe or looped ribbon. Feathers can be added between the flower layers for more interest.

Flower brooches are not just for your lapel -- Back a pair of pretty flowers with shoe clips and wear them on your shoes! Or construct a garden on a pretty straw handbag. Sew some on a linen guest towel using the center design included in the design set. (Complete directions for this method of application are included in the set.) No matter where you put they are sure to bloom!

Resources:
www.orientalsilk.com see Mulberry Silk for silk organza
www.thaisilks.com
www.denverfabrics.com
G-Street Fabrics see www.gstreetfabrics.com for locations

These directions may not be reproduced, copied or distributed without prior permission from Evy Hawkins at A Bit of Stitch. Thank you. For a printable version of these instructions please click here.

FREE Flower Brooch Design and Instructions
Evy has generously donated a FREE Flower Brooch Design, complete with leaves. Download this and see how easy it is to make your own 3D Flower Brooch. Full directions are included with your download. You will find the freebie on the Spring Blooms page.

FREE Applied Butterfly & Flower
Applied designs are especially digitized to be 3D. You can download freebies to try from the Applied Bugs & Applied Flowers pages at A Bit of Stitch.

The insect wings or flower petals are stitched separately on sheer fabrics and applied to your projects with the body design of each bug, or stem of each flower.

Applique


The information on this page was supplied by Evy Hawkins from A Bit of Stitch and was previously published in the magazine Flair UK, November 2006

Do you have an overflowing fabric stash? Do you have limited time to spend at your embroidery machine? If you answered yes to both these questions, then embroidery machine appliqué is definitely for you!

Because appliqué designs use fabric to cover the majority of the project instead of thread, the stitching time is greatly reduced. Even small pieces of stashed fabrics can be put to good use with appliqué designs. Change the appliqué fabric; stitch the design again and voila! A completely different look can be achieved.

Machine appliqué is very simple. These are the three main steps:

  • Appliqué Material (Outline Stitching)
  • Appliqué Position (Tack-down Stitching)
  • Appliqué (Finishing Satin Stitching)

The first step shows you exactly where the appliqué fabric will be placed on the background material. The second step secures the appliqué fabric into position. The third and final step covers the raw edges of the appliqué material with satin stitching, appliquéing the fabric in place.

As with any technique, there is always more than one way to accomplish the goal. Some designers suggest making templates using either a provided template design or the appliqué material stitching outline; cutting out the fabric and then placing the cut-out appliqué into position. Some appliqué designs come with pre-cut fabric pieces to use for the appliqué portions of the design.

In this article we will discuss a very easy method of appliqué that does not require using either pre-cut fabric pieces or templates.

Before you begin Applique

It is always important to pre-shrink project fabric. It is doubly important to do so when using appliqué designs. Natural fibers (rayon, silk, linen, cotton, wool) all reduce at different rates when washed. Man-made fibers may also reduce, although usually very slightly. If an appliqué fabric reduces more or less than the project fabric underneath it, a wrinkled, puckered appearance will be the result after the first washing.

Appliqué designs will look better longer if the appliqué fabric has been adhered to the background material. This is easily accomplished using fusible webbing on the back of the appliqué fabrics. Fused appliqué fabric will not sag or wrinkle. Most fabric intended for appliqué should be backed with fusible webbing, with a few exceptions. Faux fur, vinyl, leather, fleece or any specialty fabric that will melt or crush during contact with heat should not be fused.

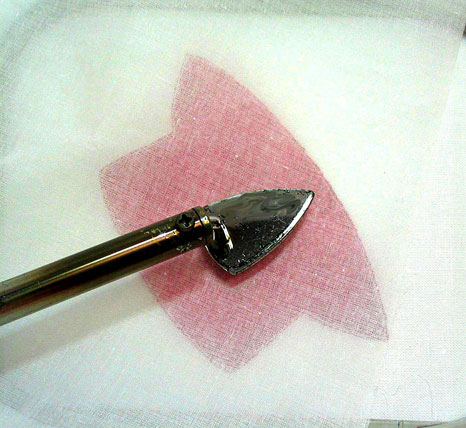
A mini-iron may be used to fuse the appliqué fabric directly in the hoop. The fabric should be fused after trimming and before stitching the final appliqué satin stitch edging. Place the hoop on a hard, flat, heat protected surface while doing so. Protect the appliqué fabric with a pressing cloth while ironing.

Choosing fabric for your Applique

The sky is truly the limit when choosing fabrics for appliqué. The only fabrics to avoid are those that tend to ravel badly, such as satin faced brocade.* One of the joys of appliqué is that many different choices are available, often within the same piece of printed fabric. Small portions of very large printed fabric work great for little appliqués. Layering sheer fabrics over other material will achieve interesting results. Give a plain cotton fabric a bit of glimmer by laying a piece of sparkle tulle or organza over it. Bold colors will be softened with a layer of chiffon or silk organza.

Thrift stores are great places to find unusual and unique fabrics for appliqué. Garments made from silk and other fine fibers are readily available at rock bottom prices. It doesn’t matter if the garment is un-wearable, the wrong size or just plain ugly! (Not to mention that it’s wonderfully therapeutic to whack up a garment with scissors on purpose!)

Fine leather, vinyl, plastic (such as flannel backed table cloths) fabric paper, wide ribbons and woven trims all make great appliqué fabrics. Don’t forget to check out your linen closet, your closet or even your husband’s closet for inspiration. If you can’t use it, can’t or won’t wear it and it is too good to throw away, give it a new life in an appliqué!

Tip: Fabrics that tend to fray* may still be used with a little special handling. Lay a piece of sheer fabric (such as silk organza or fine tulle) over the fabric when placing the appliqué fabric into position. The overlay fabric will help prevent delicate fibers from fraying later.

Back light colored fabrics with interfacing or white fabric when appliquéing on dark backgrounds. Fuse both layers together with fusible webbing then apply another layer of fusing to be used while ironing the appliqué to the background. This step is also helpful when placing a light colored appliqué over a darker colored appliqué.

The right scissors make appliqué trimming a snap. Use small, very sharp scissors with curved blades. (See resources)

Step by Step Guide for Sewing an Applique Design.

Follow these step by step directions to complete the free Valentine Hat design and find out for yourself just how fun and easy machine appliqué can be!

To begin:

Valentine Hat Color Chart

  1. Appliqué Material – first hat outline
  2. Appliqué Position – second hat outline tack-down stitching
  3. Appliqué – hat satin stitching
  4. Heart decorations (metallic gold)
  5. Appliqué Material – first bow outline
  6. Appliqué Position – second bow outline tack-down stitching
  7. Appliqué – bow satin stitching
  8. Bow center (metallic gold)

  • Choose the appliqué fabrics. Back each piece with fusible webbing according to the manufacturer’s directions. Remove the paper backing before beginning.
  • Choose the thread colors. (Note: Match the appliqué material, position and satin stitching thread colors to the appliqué fabrics. However, if you find it difficult to see the appliqué position outline stitching, change the thread color for that stitch sequence to a lighter or darker shade for easier trimming.)
  • Load the design into the embroidery machine.
  • Stabilize the project fabric. Iron-on stabilizer is highly recommended. When stabilizer is adhered to the project fabric, the best results are produced. Iron-on stabilizer is easy to apply and easy to remove. An additional layer of regular tear-away stabilizer may be slipped under the hoop after the hoop is in the machine, if necessary.
  • Hoop the stabilized fabric and place the hoop in the machine. This design requires a 4x4 hoop.
  • Sew the first stitch sequence, appliqué material. This is the first outline stitching for the hat.
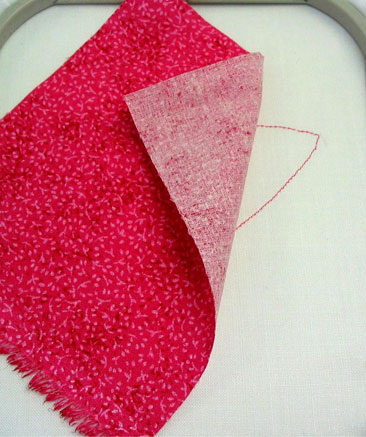
  • Place a piece of hat appliqué material over the outline stitching, fused side down. Hold the fabric in place with temporary spray adhesive, if necessary.

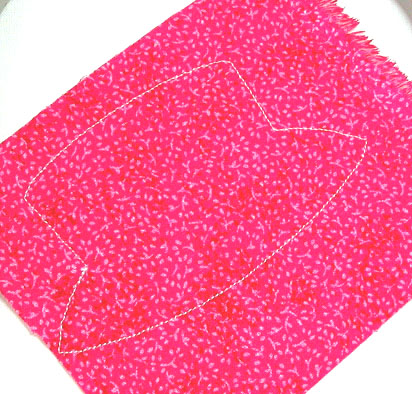
  • Sew the second stitch sequence, appliqué position. This outline stitching will secure the hat fabric into position on the background fabric.

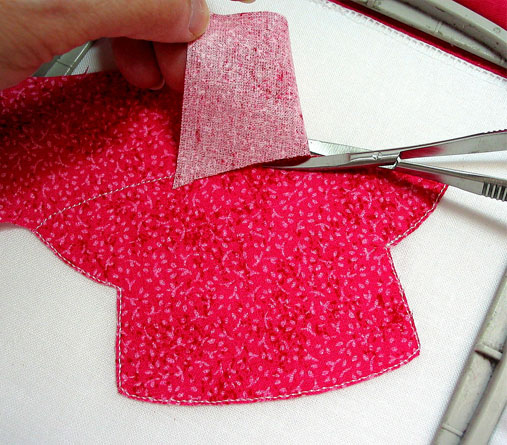
  • Remove the hoop from the machine. Do not remove the fabric from the hoop. Place on a hard flat surface (not your lap!) and carefully trim away the excess appliqué fabric. Trim as close as possible to the stitching. Hold up the excess fabric with one hand while trimming with the other for best results.

  • Place the hoop on a hard, flat, heat protected surface and adhere the appliqué fabric to the background fabric using a mini-iron. Protect the appliqué fabric with a press cloth.

  • Put the hoop back in the machine and sew the third stitch sequence, appliqué. This is the finishing satin stitch edging around the hat.
  • Sew the heart decorations, stitch sequence number four.
  • Sew the fifth stitch sequence, appliqué material. This is the first outline stitching for the bow on the hat.
  • Place a piece of bow appliqué material over the outline stitching, fused side down. Hold the fabric in place with temporary spray adhesive, if necessary.
  • Sew the sixth stitch sequence, appliqué position. This outline stitching will secure the bow fabric into position on the hat.
  • Remove the hoop from the machine. Do not remove the fabric from the hoop. Carefully trim away the excess bow fabric.
  • Once again, place the hoop on a hard, flat, heat protected surface and adhere the appliqué fabric to the background fabric using a mini-iron. Protect the appliqué fabric with a press cloth.
  • Put the hoop back in the machine and sew the seventh stitch sequence, appliqué. This is the finishing satin stitch edging around the bow. Stitch the last stitch sequence, the bow center.

Wasn’t that easy!

Evy Hawkins

A Bit of Stitch

Resources:

www.tools-gadgets.com Embroidery Nips (trimming scissors)

www.nancynotions.com Mini Iron & Totally Stable stabilizer

www.sprayandfix.com 505 Spray and Fix Temporary Spray Adhesive

Embroider on Paper


Embroidering with Paper
By Shelly Smola from My Fair Lady Designs.

Tips:

1. You will need suitable light weight stipple designs to use for the paper embroidery, such as the Valentine Stipple from My Fair Lady as pictured above.

2. Paper of any weight can be used, and any kind of paper can be used - vellum, mulberry paper, handmade paper, etc. In general, the lighter the paper, the better the stitch quality (strange, I know!). Also, cardstock with texture embroiders beautifully. Bazzill paper is my favorite cardstock to use for paper embroidery. To get a good quality stitch on really heavy cardstock, hoop two pieces of tear-away stabilizer. You can also just float a second piece of stabilizer under the design area. This is a great way to use those pieces of stabilizer that are too small to hoop but too big to throw away.

3. Another way to get a better stitch on heavy cardstock is to stitch the design twice before taking the hoop out of the machine.

4. Use the correct needle. A larger needle will create bigger holes in your paper. Smaller needles tend to break easily, so experiment with your paper to find the best size. I almost always use a size 80/12 unless I am embroidering on really heavy cardstock.

5. Stitch a sample!

How to Embroider on Paper

1. Hoop a piece of stabilizer. You can use any kind. I prefer tear-away (the cheap stuff).

2. Get your paper ready. After you have chosen your paper and decided what your finished product will be, cut, score, or fold the paper to the finished size. Decide where you want the embroidery design and how it should be oriented.

3. Unfold the paper, and place it on the hooped stabilizer. You will need to lightly adhere the paper to the stabilizer using small amount of adhesive fabric spray or double-sided tape. Do not hoop the paper! If you use adhesive fabric spray like Sulky KK2000 or 505 spray, use it sparingly, as it can soak through the paper. I prefer double-sided tape. Apply the tape to the back of the paper, then stick the paper to the stabilizer. Try to apply the tape so that it is not in the embroidery area, as it can gum the needle.

4. Gently place the hoop in the machine, and sew the design.

5. Remove paper and stabilizer from the hoop. Cut away the stabilizer close to the design. Although it is tempting to tear the stabilizer away (it is tear-away after all!), don’t do it! You can easily tear your stitches or the paper.

How to Applique on Paper

Paper appliqué is the same as fabric appliqué!

1. Use the same thread for the first three sequences. Sew the first sequence (the outline of the appliqué). This sequence tells you where to put the appliqué material.

2. Place your appliqué material (paper or fabric) over the outline. You may want to adhere this piece with double-sided tape or fabric adhesive. I like to just hold this piece in place until the first few stitches are sewn.

3. Sew the second sequence (same as the first sequence). This sequence tacks the appliqué material down.

4. Remove the hoop, and cut away the fabric or paper close to the sewn guideline. When using paper as the appliqué material, cut the paper away using an X-Acto knife or other sharp blade. Press hard enough to cut the top layer, but not the bottom layer! If you do cut through to the bottom layer, it will be covered by the stitching.

5. Place the hoop back into your machine and sew the third sequence. This sequence finishes the appliqué. Continue sewing the rest of the design.

Click Here for a pintable version of these instructions in .pdf format.

These tips are copyrighted and may not be reproduced without prior permission from My Fair Lady