| How to use Embroidered Silk Flowers with Embroidery Vest Instructions using Silk Flowers
Materials Used:
Directions: Begin by removing the polysilk artificial flowers and leaves from their stems. Pull apart each flower, removing any plastic parts. Discard stems and plastic parts. Be sure to double check behind the leaves, if there is a plastic part attached, gently peel it off. Spread a press cloth over your ironing board. Spray each flower petal and leaf with water, place on the press cloth and cover them with another press cloth. Iron the flowers and leaves flat using the highest steam setting the flowers will withstand. This is usually the cotton setting, but check first! You may choose not to use the top press cloth, but be very sure you have removed all plastic parts from the flowers. If your flowers resist flattening, place them under some heavy books overnight. Cut out your vest, serging or stay stitching all raw edges to stabilize them. Cut corresponding pieces of bridal tulle for all the vest pieces you will be applying the flowers to. It is helpful to cut the tulle a little larger than the vest pieces. Lay your vest pieces, right side up on a flat surface. Arrange the pressed flower parts on the vest. Feel free to trim the flower parts and leaves to better accommodate your design. When you are happy with the arrangement, spray the matching tulle vest piece with temporary spray adhesive and carefully place over the flower decorated vest fabric. Be careful with glue overspray...spread newspapers on the floor or use a large cardboard box to do your spraying in. You may need to place a few straight pins here and there to further secure the tulle and flowers to the vest fabric.
Using regular sewing thread in your bobbin to match the vest fabric and your choice of decorative embroidery thread in the top, freehand stitch the tulle to the vest fabric on your sewing machine using a normal stitch length. You can use a lazy meandering pattern, or crisscross the fabric in a grid. Just be sure that you stitch through all the flowers and leaves enough to prevent them from shifting.
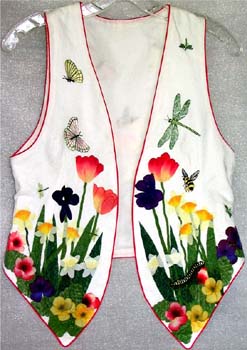
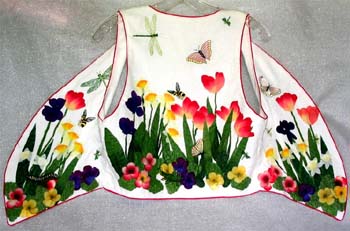
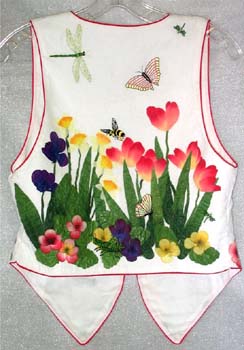
The silk flowers need to be covered by the tulle, but you may choose not to cover your whole vest with tulle. Only the floral portion of the bug vest shown is covered with tulle. If you wish to do this, decide where you want the tulle to stop, straight stitch along this line, trim the excess tulle away and zigzag stitch the new tulle edge. Use a very narrow zigzag in a normal stitch length. You do not need to zigzag the edges of the tulle when they will be enclosed in your seam allowances. Stay stitch again around the edges of the vest where the tulle has been applied. Trim the edges of the tulle flush with the edges of the vest fabric.
Embroider the vest with your choice of embroidery designs at this time. Using a size 90/14 embroidery needle is recommended. Bugs, butterflies and other pretty winged creatures are wonderful choices for embroidery on silk flowers.
Finish the vest according to your pattern instructions. Polysilk flowers are washable in cold or warm water, and can be machine dried on low heat. When ironing your finished vest, be sure to use a press cloth, or iron from the wrong side. The polysilk flowers will withstand the heat of your iron, but the bridal tulle will not.
Variations and Other Projects: Another fun use for this technique is shown on the handbag. Here the flowers have been placed to form a frame for the fashion lady embroidery design. This bag features an Applique Red Hat Lady design from A Bit of Stitch. These directions may not be reproduced, copied or distributed without prior permission from Evy Hawkins at A Bit of Stitch. Thank you. |
Monday, September 7, 2009
Use Silk Flowers - with Embroidery


Create a Puzzle Bag
How to make a Valentine Puzzle Bag
by Shelly Smola at My Fair Lady
| You will need:
| |

Instructions:
Embroider the February Puzzle pages following the instructions included in the set.
|
Cut 2 pieces of lining fabric. Measurements:
| |

| Place one piece of lining and Page 1 right sides together. If you want trim around the top of the bag, place it along the top as shown. Stitch the lining to Page 1 across the top. All seam allowances are .?h. | |

| Open Page 1 and the lining, and press the seam allowance toward the lining. Stitch the seam allowance to the lining as shown. | |

| Repeat with Page 2 and the second piece of lining. | |

|
Place the front and back of the bag right sides together. If you want trim along the bottom (beads, tassels, pom poms, etc), place it between the pages along the bottom toward the inside. | |

| Stitch around the edges, leaving an opening in the bottom of the liner. | |

| Turn the bag right side out. Stitch the bottom of the lining closed. | |

| Tuck the lining into the bag. Hand-sew the beaded handles to the bag (if desired). | |

These directions may not be reproduced, copied or distributed without prior permission from Shelly Smola at My Fair Lady . Thank you. For a printable version of these instructions click here.
Embroider Cutwork
| by Shelly Smola of My Fair Lady Supply List: Wash-away mesh stabilizer Small embroidery nips 505 or Sulky KK2000 Adhesive Spray Seam ripper Fray Check
Cutwork Instructions The following instructions demonstrate the method for embroidering a cutwork design from My Fair Lady. Other designers may use a different method. Please read all instructions before stitching any cutwork designs.
Step 1 Step 2 Step 3 Tip: Hold your hoop by the hoop!! It’s easy to push your fingers through the fabric if you hold the hoop as shown. This is a common mistake, and your fingers will displace the fabric. This will lead to an unattractive and imperfect stitchout.
Step 4 Step 5 Step 6
Tip: Make sure that your hoop is sitting on a flat surface while you trim the fabric. Be careful not to loosen the fabric inside the hoop.
Step 7 Step 8 Step 9
Tip: If you accidentally cut part of the stabilizer, “float” a small piece of stabilizer under the cut. To do this, cut a small piece of stabilizer slightly larger than the cutout area, and use spray adhesive to hold it to the bottom of your hoop.
Washing and Ironing
Resources
Copyright Information Free Design Download Visit My Fair Lady's Heirloom Cutwork Design page to download both Project Instructions and the above freebie design. |


Make a Spring Quilt
by Shelly Smola of My Fair Lady
| Quilt Instructions |
| Quilt Supplies |
| 6 Main Quilt Squares (1 of each square) |
| Finished Quilt Sizes |
Sashing and Binding
The quilt shown has pink sashing (the strips of fabric in between each quilt square) inside the 6 individual blocks, and yellow sashing separating the 6 large blocks. The yardage is given below.
| |
4x4 Squares
5x5 Squares
6x6 Hoop |

Quilt Assembly
The quilt will be assembled in "sets" of 9 pieces at a time. Start with 1 main quilt square and its 4 matching corners and 4 half squares.
1. Take the top left corner square and place it over the pink sashing, right sides together. (The grey image above is the wrong-side of the fabric - the pink is the right-side). 2. Stitch together using the stitched border on the corner square as your seam guide. Stitch JUST INSIDE the line as shown to hide the seam guide. 3. Trim the unused portion of the sashing. 4. Open the sashing and finger press. The seam will naturally open toward the sashing. 5. Place a half square right sides together with the sashing. 6. Stitch together using the stitched border on the half square as your seam guide. Stitch JUST INSIDE the line as shown to hide the seam guide. 7. Open the sashing and finger press. 8. Place the corner and half square right sides together with the unused strip of sashing. Stitch together using the stitched border on the half square as your seam guide. Remember to stitch just inside the seam guide. 9. Trim the unused portion of the sashing. As you complete the block, if the unused sashing isn't long enough, set it aside and use it for smaller sections. Start with a new strip when necessary. 10. Open the sashing and finger press. 11. Place a corner square right sides together with the sashing. Stitch together using the stitched border on the corner square as your seam guide. Remember to stitch just inside the seam guide. 12. Lay the row flat and iron. Use a pressing cloth and iron from the front. Do not iron from the back, as the wash-away stabilizer will shrink and distort the blocks. 13. Sew two half squares and the main square together with sashing and iron open. 14. Repeat for the last two corners squares and half square. 15. Sew the 3 rows together with sashing in the same manner. Complete the other 5 blocks following the same steps. Iron each block when finished. Remember to iron from the front with a pressing cloth. 16. Sew the top two large blocks together using the yellow sashing. 17. Sew the middle two large blocks together using the yellow sashing. 18. Sew the bottom two large blocks together using the yellow sashing.


19. Sew the 3 rows together with sashing.
20. Cut the fabric for the back of the quilt slightly larger than your quilt. Lay the quilt top on the quilt back, WRONG sides together and pin.
21. "Stitch in the ditch" along the yellow sashing and around the six main squares to secure the back and protect the batting. TIP: Use a walking foot!
22. Baste the quilt top to the back around the edge. Trim the back to match the quilt.

Binding
1. Sew the binding strips together, and press the seams open. 2. Press under ¼" along one short edge. Press under ¼" along one long edge.
wrong side


3. Beginning a few inches away from a corner on one side, stitch the unfolded side of the binding to the quilt. Stitch just inside the seam line already stitched on the quilt.

4. To miter the corners, stop sewing ¼" from the corner and backstitch.

5. Fold the binding so that it is in line with the edge you will be sewing, then fold it back down so that the raw edges are together again. The fold should line up with the edge of the quilt top. Pin in place.
6. Turn the quilt so that you will be ready to sew the next edge. Begin sewing the next edge ¼" from the top.
7. Continue sewing the binding around quilt, mitering corners as you go.


8. When you reach the starting point, overlap the edges about ½". Tuck the end of the binding under the fold of the starting point.
9. Turn the binding to the back of the quilt and hand-stitch so that the seam line on the back is covered. Hand-stitch the front of the binding where the two ends meet.
Washing
Wash your quilt in warm water to remove the stabilizer. Tumble dry on low heat. Remove the quilt from the dryer while it is slightly damp and lay it flat to dry.
