Click and Fill vs. Manual Punch
Written by Carolyn Keber
author of Steby by Step tutorails for Embird, PE Design and others.
I have chosen to explain briefly about the different methods of creating your own designs in your embroidery software. I must advise you right here and now that what I have written below is entirely my opinion. My opinion may not be your opinion and there are really no rights and wrongs with digitizing, just preferences.
The main program that I use for digitising is Embird Studio or PE Design , but most digitizing programs have similar features. There are now also several new-ish embroidery software programs on the market that allow you to just point and fill areas which very quickly gives you an embroidery design.
While this is a wonderful quick way to create a design it does not always create the best result. You may find that outlines do not sew correctly or close enough to a design or that you have a lot of jump stitches to remove when you have embroidered your design. Do you remember when you embroidered a design from a pre-programmed card, CD or from one of the professional digitizers?
You should have been impressed if the design embroidered out with either nojump stitches or the very minimum. This is the mark of an excellent digitizer. You will find that the professional digitizers do not use click and fill programs at all as they like to control the path of the stitching themselves and not leave it up to the program.
The difference between the good and the excellent designs is the method used to create the design. I guess it's like that old saying your Mum had, "if a job is worth doing then its worth doing well".
Check your program to see whether you have the option of actually inputting the stitches yourself rather than allowing the program to make the decisions for you. If you have this option it will be worth the effort to learn how to use it. The click and fill method is great if you are in a hurry and it is a one-off design you are doing, but if you intend stitching your design out time and again, then you should try to learn to digitize your design.
When you use a click and fill type program and you move from one area to the next of the same color you do not generally have the option of how the stitching continues. The program takes the shortest route which is normally a regular jump stitch. However if you were punching the design yourself you would try andeliminate that jump stitch by changing your punching tool to a running stitch. Then you would run-stitch from one area to another through an area that would be sewn over later, thus covering this stitching.
The other draw-back is in the creation of a design with a larger area of fill. I am sure you have all sewn out a design on fabric with a pile such as a towel to find that that the design does not meet in the centre leaving you with a line of no stitches. This is the sign of a design that has been created using the click and fill method. The design will begin sewing from one side then it embroiders towards the centre. Once it reaches a certain point the stitching moves to the outside and then sews back towards the middle of the design until it meets. But as you know, it sometimes doesn't quite meet causing you a certain amount of frustration.
If the design has been Manual Punched the design will sew exactly as you have applied the stitches. Learning to manual punch a design isn't as daunting as it sounds. Sure, it takes longer to do it this way but the end result will be a lot better. As with anything practice makes perfect and just by having the courage to have a play around with the program will teach you a lot of new tricks.
One way to start would be to create a design in a click and fill program and then take the design and add some other elements to it in your manual punching program. You can add bits of shading, outlines or whatever you fancy. Once you have tried this you might feel courageous enough to try manual punching a complete design. One step at a time.
Remember to test, test and test.
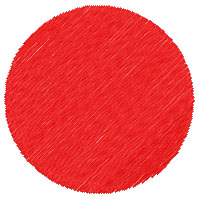
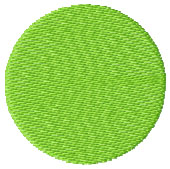
Here are 2 links to download two designs that I have prepared for you, as a sample of what I'm talking about. One design is done with Manual Punching, the other with Click and Fill . If you have Embird then you can run these designs through Sewing Simulator just to see what I mean about designs not joining in the middle from a click and fill program. Check the Manual Punched design and you will see that there are no gaps as it stitches from one side right through to the other side of the circle.
Then you will have to make you own decision as to which method you would rather use when creating your designs. Do you settle for good, or would you prefer to be excellent? It's up to you.
Carolyn
Click and Fill vs. Manual Punch
Written by Carolyn Keber
author of Steby by Step tutorails for Embird, PE Design and others.
I have chosen to explain briefly about the different methods of creating your own designs in your embroidery software. I must advise you right here and now that what I have written below is entirely my opinion. My opinion may not be your opinion and there are really no rights and wrongs with digitizing, just preferences.
The main program that I use for digitising is Embird Studio or PE Design , but most digitizing programs have similar features. There are now also several new-ish embroidery software programs on the market that allow you to just point and fill areas which very quickly gives you an embroidery design.
While this is a wonderful quick way to create a design it does not always create the best result. You may find that outlines do not sew correctly or close enough to a design or that you have a lot of jump stitches to remove when you have embroidered your design. Do you remember when you embroidered a design from a pre-programmed card, CD or from one of the professional digitizers?
You should have been impressed if the design embroidered out with either nojump stitches or the very minimum. This is the mark of an excellent digitizer. You will find that the professional digitizers do not use click and fill programs at all as they like to control the path of the stitching themselves and not leave it up to the program.
The difference between the good and the excellent designs is the method used to create the design. I guess it's like that old saying your Mum had, "if a job is worth doing then its worth doing well".
Check your program to see whether you have the option of actually inputting the stitches yourself rather than allowing the program to make the decisions for you. If you have this option it will be worth the effort to learn how to use it. The click and fill method is great if you are in a hurry and it is a one-off design you are doing, but if you intend stitching your design out time and again, then you should try to learn to digitize your design.
When you use a click and fill type program and you move from one area to the next of the same color you do not generally have the option of how the stitching continues. The program takes the shortest route which is normally a regular jump stitch. However if you were punching the design yourself you would try andeliminate that jump stitch by changing your punching tool to a running stitch. Then you would run-stitch from one area to another through an area that would be sewn over later, thus covering this stitching.
The other draw-back is in the creation of a design with a larger area of fill. I am sure you have all sewn out a design on fabric with a pile such as a towel to find that that the design does not meet in the centre leaving you with a line of no stitches. This is the sign of a design that has been created using the click and fill method. The design will begin sewing from one side then it embroiders towards the centre. Once it reaches a certain point the stitching moves to the outside and then sews back towards the middle of the design until it meets. But as you know, it sometimes doesn't quite meet causing you a certain amount of frustration.
If the design has been Manual Punched the design will sew exactly as you have applied the stitches. Learning to manual punch a design isn't as daunting as it sounds. Sure, it takes longer to do it this way but the end result will be a lot better. As with anything practice makes perfect and just by having the courage to have a play around with the program will teach you a lot of new tricks.
One way to start would be to create a design in a click and fill program and then take the design and add some other elements to it in your manual punching program. You can add bits of shading, outlines or whatever you fancy. Once you have tried this you might feel courageous enough to try manual punching a complete design. One step at a time.
Remember to test, test and test.
Here are 2 links to download two designs that I have prepared for you, as a sample of what I'm talking about. One design is done with Manual Punching, the other with Click and Fill . If you have Embird then you can run these designs through Sewing Simulator just to see what I mean about designs not joining in the middle from a click and fill program. Check the Manual Punched design and you will see that there are no gaps as it stitches from one side right through to the other side of the circle.
|
|
Then you will have to make you own decision as to which method you would rather use when creating your designs. Do you settle for good, or would you prefer to be excellent? It's up to you.
Carolyn
No comments:
Post a Comment