| The information on this page was supplied by Evy Hawkins from A Bit of Stitch and was previously published in the magazine Flair
Do you have an overflowing fabric stash? Do you have limited time to spend at your embroidery machine? If you answered yes to both these questions, then embroidery machine appliqué is definitely for you!
Because appliqué designs use fabric to cover the majority of the project instead of thread, the stitching time is greatly reduced. Even small pieces of stashed fabrics can be put to good use with appliqué designs. Change the appliqué fabric; stitch the design again and voila! A completely different look can be achieved.
Machine appliqué is very simple. These are the three main steps:
The first step shows you exactly where the appliqué fabric will be placed on the background material. The second step secures the appliqué fabric into position. The third and final step covers the raw edges of the appliqué material with satin stitching, appliquéing the fabric in place.
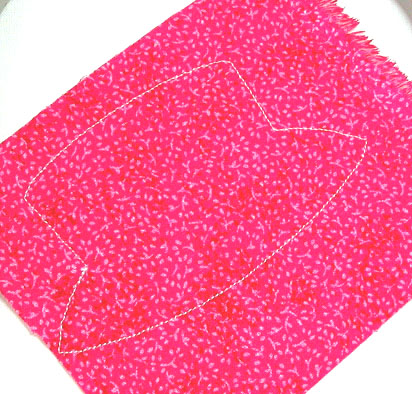
As with any technique, there is always more than one way to accomplish the goal. Some designers suggest making templates using either a provided template design or the appliqué material stitching outline; cutting out the fabric and then placing the cut-out appliqué into position. Some appliqué designs come with pre-cut fabric pieces to use for the appliqué portions of the design.
In this article we will discuss a very easy method of appliqué that does not require using either pre-cut fabric pieces or templates. |
| Before you begin Applique It is always important to pre-shrink project fabric. It is doubly important to do so when using appliqué designs. Natural fibers (rayon, silk, linen, cotton, wool) all reduce at different rates when washed. Man-made fibers may also reduce, although usually very slightly. If an appliqué fabric reduces more or less than the project fabric underneath it, a wrinkled, puckered appearance will be the result after the first washing. Appliqué designs will look better longer if the appliqué fabric has been adhered to the background material. This is easily accomplished using fusible webbing on the back of the appliqué fabrics. Fused appliqué fabric will not sag or wrinkle. Most fabric intended for appliqué should be backed with fusible webbing, with a few exceptions. Faux fur, vinyl, leather, fleece or any specialty fabric that will melt or crush during contact with heat should not be fused.
A mini-iron may be used to fuse the appliqué fabric directly in the hoop. The fabric should be fused after trimming and before stitching the final appliqué satin stitch edging. Place the hoop on a hard, flat, heat protected surface while doing so. Protect the appliqué fabric with a pressing cloth while ironing. |
| Choosing fabric for your Applique
The sky is truly the limit when choosing fabrics for appliqué. The only fabrics to avoid are those that tend to ravel badly, such as satin faced brocade.* One of the joys of appliqué is that many different choices are available, often within the same piece of printed fabric. Small portions of very large printed fabric work great for little appliqués. Layering sheer fabrics over other material will achieve interesting results. Give a plain cotton fabric a bit of glimmer by laying a piece of sparkle tulle or organza over it. Bold colors will be softened with a layer of chiffon or silk organza.
Thrift stores are great places to find unusual and unique fabrics for appliqué. Garments made from silk and other fine fibers are readily available at rock bottom prices. It doesn’t matter if the garment is un-wearable, the wrong size or just plain ugly! (Not to mention that it’s wonderfully therapeutic to whack up a garment with scissors on purpose!)
Fine leather, vinyl, plastic (such as flannel backed table cloths) fabric paper, wide ribbons and woven trims all make great appliqué fabrics. Don’t forget to check out your linen closet, your closet or even your husband’s closet for inspiration. If you can’t use it, can’t or won’t wear it and it is too good to throw away, give it a new life in an appliqué!
Tip: Fabrics that tend to fray* may still be used with a little special handling. Lay a piece of sheer fabric (such as silk organza or fine tulle) over the fabric when placing the appliqué fabric into position. The overlay fabric will help prevent delicate fibers from fraying later.
Back light colored fabrics with interfacing or white fabric when appliquéing on dark backgrounds. Fuse both layers together with fusible webbing then apply another layer of fusing to be used while ironing the appliqué to the background. This step is also helpful when placing a light colored appliqué over a darker colored appliqué.
The right scissors make appliqué trimming a snap. Use small, very sharp scissors with curved blades. (See resources) |
Step by Step Guide for Sewing an Applique Design.
Follow these step by step directions to complete the free Valentine Hat design and find out for yourself just how fun and easy machine appliqué can be!
To begin:
- Download the free Valentine Hat design from A Bit of Stitch
Valentine Hat Color Chart
- Choose the appliqué fabrics. Back each piece with fusible webbing according to the manufacturer’s directions. Remove the paper backing before beginning.
- Choose the thread colors. (Note: Match the appliqué material, position and satin stitching thread colors to the appliqué fabrics. However, if you find it difficult to see the appliqué position outline stitching, change the thread color for that stitch sequence to a lighter or darker shade for easier trimming.)
- Load the design into the embroidery machine.
- Stabilize the project fabric. Iron-on stabilizer is highly recommended. When stabilizer is adhered to the project fabric, the best results are produced. Iron-on stabilizer is easy to apply and easy to remove. An additional layer of regular tear-away stabilizer may be slipped under the hoop after the hoop is in the machine, if necessary.
- Hoop the stabilized fabric and place the hoop in the machine. This design requires a 4x4 hoop.
- Sew the first stitch sequence, appliqué material. This is the first outline stitching for the hat.
- Place a piece of hat appliqué material over the outline stitching, fused side down. Hold the fabric in place with temporary spray adhesive, if necessary.
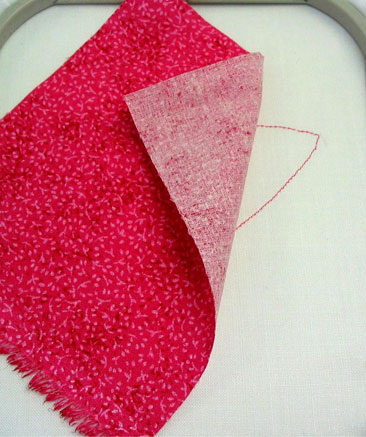
- Sew the second stitch sequence, appliqué position. This outline stitching will secure the hat fabric into position on the background fabric.
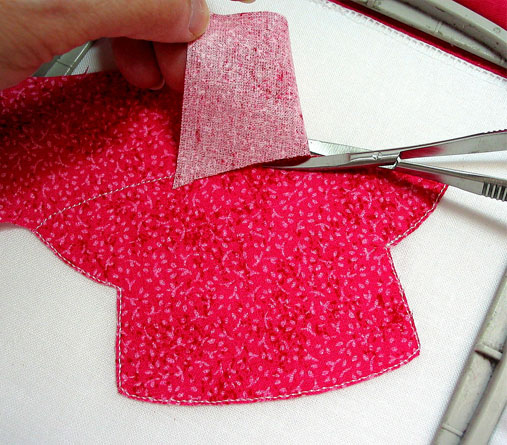
- Remove the hoop from the machine. Do not remove the fabric from the hoop. Place on a hard flat surface (not your lap!) and carefully trim away the excess appliqué fabric. Trim as close as possible to the stitching. Hold up the excess fabric with one hand while trimming with the other for best results.
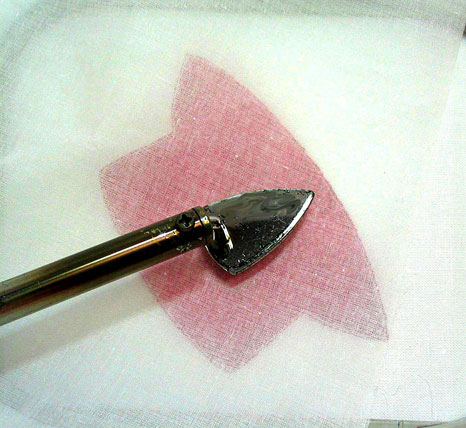
- Place the hoop on a hard, flat, heat protected surface and adhere the appliqué fabric to the background fabric using a mini-iron. Protect the appliqué fabric with a press cloth.
- Put the hoop back in the machine and sew the third stitch sequence, appliqué. This is the finishing satin stitch edging around the hat.
- Sew the heart decorations, stitch sequence number four.
- Sew the fifth stitch sequence, appliqué material. This is the first outline stitching for the bow on the hat.
- Place a piece of bow appliqué material over the outline stitching, fused side down. Hold the fabric in place with temporary spray adhesive, if necessary.
- Sew the sixth stitch sequence, appliqué position. This outline stitching will secure the bow fabric into position on the hat.
- Remove the hoop from the machine. Do not remove the fabric from the hoop. Carefully trim away the excess bow fabric.
- Once again, place the hoop on a hard, flat, heat protected surface and adhere the appliqué fabric to the background fabric using a mini-iron. Protect the appliqué fabric with a press cloth.
- Put the hoop back in the machine and sew the seventh stitch sequence, appliqué. This is the finishing satin stitch edging around the bow. Stitch the last stitch sequence, the bow center.
Wasn’t that easy!
Evy Hawkins
Resources:
www.tools-gadgets.com Embroidery Nips (trimming scissors)
www.nancynotions.com Mini Iron & Totally Stable stabilizer
www.sprayandfix.com 505 Spray and Fix Temporary Spray Adhesive
No comments:
Post a Comment